Thursday, March 24, 2016
Form challenge
Form Challenge
I liked doing the piece but most of it was difficult. Attaching the tree trunk to the base was hard to do and I used a lot of glue. I then tried to figure out how to attach the leaves to the trunk. I used wire to do this after trying several times to make it look nice without it. Once I made the wire stems and rolled the green paper it was easy to attach them to the tree. Another problem was attaching the bird to the tree, I don't think it is securely attached it could fall off at any moment and I need to fix that. I learned how to use wire effectively when adding things to a piece of art.
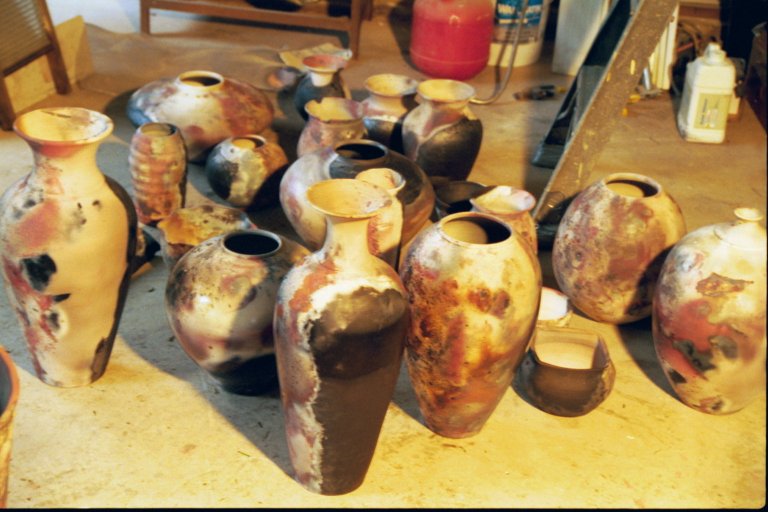
Pit Fire 1+2
Pit Fire 1&2
Pit fire is a piece with a white or light clay body that will show the darker colours of the chemical stains, and has large smooth areas to show off the swirls, smudges and splatters. Saggars are simply refractory containers designed to subject the ceramic work placed in it to an atmosphere of the makers’ choice.
I used the wheel to make the piece it was basic and small. Once it was fired I put terra sig on it all over. One thing that I would have changed was the amount of stuff I put into the foil. I also put plastic on it and it was stuck to it and was very problematic. Finding the right chemicals to put on the piece was difficult and didn't work out very well. It is very different from normal firing because normal pieces are planned out more and turn out the way you planned most of the time, but pit firing pieces are more random and unplanned. Even though the piece didn't work as I planned I do like it and would do it again. Especially since now I know what not to do.
Relief post 1 and 2
Relief Post
I will be making an elephant head out of paper mache and painting it with blues and purples. First I will start with a cardboard cut out of the head and ears. Then use wire to make the trunk.
If I were to do the project over again I would add more layers of paper mache because it was too wrinkly. I would have added more paint so that it looked more realistic. While I was working on the piece I ran into a problem, the trunk was very hard to sculpt. I then used wire to make the trunk and wrapped it in news paper, taped it down and put paper mache on it. Overall I think the piece was a success.
| Final Product |
Wednesday, March 23, 2016
inspired artist
Inspired artist
Courtney Mattison is an artist that works with clay to make ceramic pieces. This pieces are mostly small pieces of coral reef which she then adds together to make a large scale piece. She was born in San Francisco, then she received an interdisciplinary Bachelor of Arts degree in marine ecology and ceramic sculpture from Skidmore College in 2008 and a Master of Arts degree in environmental studies from Brown University with coursework at the Rhode Island School of Design in 2011. Courtney choose to do coral reefs because she loves them for being exotic and diverse. She believes that "We protect what we care about and we care about what we know and understand. Art can bring the beauty and peril of reefs above the surface and into view and can inspire us to protect the ocean." so she is trying to protect the coral reefs.
Sunday, May 25, 2014
blog 6

Artist Have a Global Awareness of Artmaking
Día de los muertos
Artists Take Risks
I never thought of using wood as a material i mainly like to draw or use clay, but it had to be a sculpture and we were only allowed to use so much clay. So I looked through the box of art supplies left behind in hopes of finding some inspiration. I found wood, beads, a necklace, and a baby show with a bow on it. I thought that it would be cool to make my younger sister a door hanger with her name on it. So I first sanded the wood and prepped it to be painted. I painted it all white then add dark and light blue dots on one side and stripes on the other. That day I was talking to her and she told me her favorite color was pink so I used the pink beads I found and hot glued them on the dark blue spots. I then attached the blue necklace to hang it up adding a bow on the top.
Artists Collaborate
After all the projects were finished we did critique. Critique can be a useful thing to an artist they can take past comments on their art to shape it and mold it till it's the best it can be. The photo on the left is a picture of one of the first critiques they are very basic comments like I love the color or pattern. The one on the right is the most recent and has comments like The detail and the contrast and the vibrant colors really add to the piece and make it look amazing. I think that as a class we have grown in our art with the help of critique and have grown in the critique giving side. Like being able to use art vocabulary and pieces of the art to give a compliment and constructive criticism and the ability to ask questions.
Saturday, May 24, 2014
Blog 5
Artists Develop Art Making Skills
In art class we began the semester with drawing a hand and we would draw the letters of the alphabet. We each drew hands and learned different techniques to make the hands look more realistic. We learned about proportion and how to measure the different lengths of the hand and transfer that onto the paper. We then learned how to use value to are advantage and make the creases and folds in the hand present and realistic. Realism is the a type of art while working on our hands it helped us to learn how to mange the space and make the image make sense.
Artists Reflect
When we began the stop motion film we already had seen videos like this that were a string of photos put together. We first decided the material we would use we decided on M&M's, so we brought in M&M's then next day. We then planned how we would take the photos. We ended up putting two stools on the table and putting two meter sticks in between to hold the phone then we decided on the pattern of the M&M's. We then decide on what would happen and after we did that we each got a roll and each did something to add M&M's make the patterns or take photos. The end product was made by and app.
In art class we began the semester with drawing a hand and we would draw the letters of the alphabet. We each drew hands and learned different techniques to make the hands look more realistic. We learned about proportion and how to measure the different lengths of the hand and transfer that onto the paper. We then learned how to use value to are advantage and make the creases and folds in the hand present and realistic. Realism is the a type of art while working on our hands it helped us to learn how to mange the space and make the image make sense.
Artists Create Original Art
When drawing the letter R in sign language I used my own photo and orientation of the hand. I positioned my own hand and the photo from an angle that I liked once I took the photo I proceeded to draw it taking in how my hand was in the photo and how i saw my hand outside of the photo I took portions of each and created the drawing of the letter R. I feel that I came up with my own interpretation of the art and how it should look by using various source that I had like how the sign looked and where I took the picture and the curves of the fingers. Artists Reflect
When we began the stop motion film we already had seen videos like this that were a string of photos put together. We first decided the material we would use we decided on M&M's, so we brought in M&M's then next day. We then planned how we would take the photos. We ended up putting two stools on the table and putting two meter sticks in between to hold the phone then we decided on the pattern of the M&M's. We then decide on what would happen and after we did that we each got a roll and each did something to add M&M's make the patterns or take photos. The end product was made by and app.
Subscribe to:
Posts (Atom)


.jpg)